
Thundering Herd Problem (Cache Stampede): Solutions & Prevention | System Design Tutorial
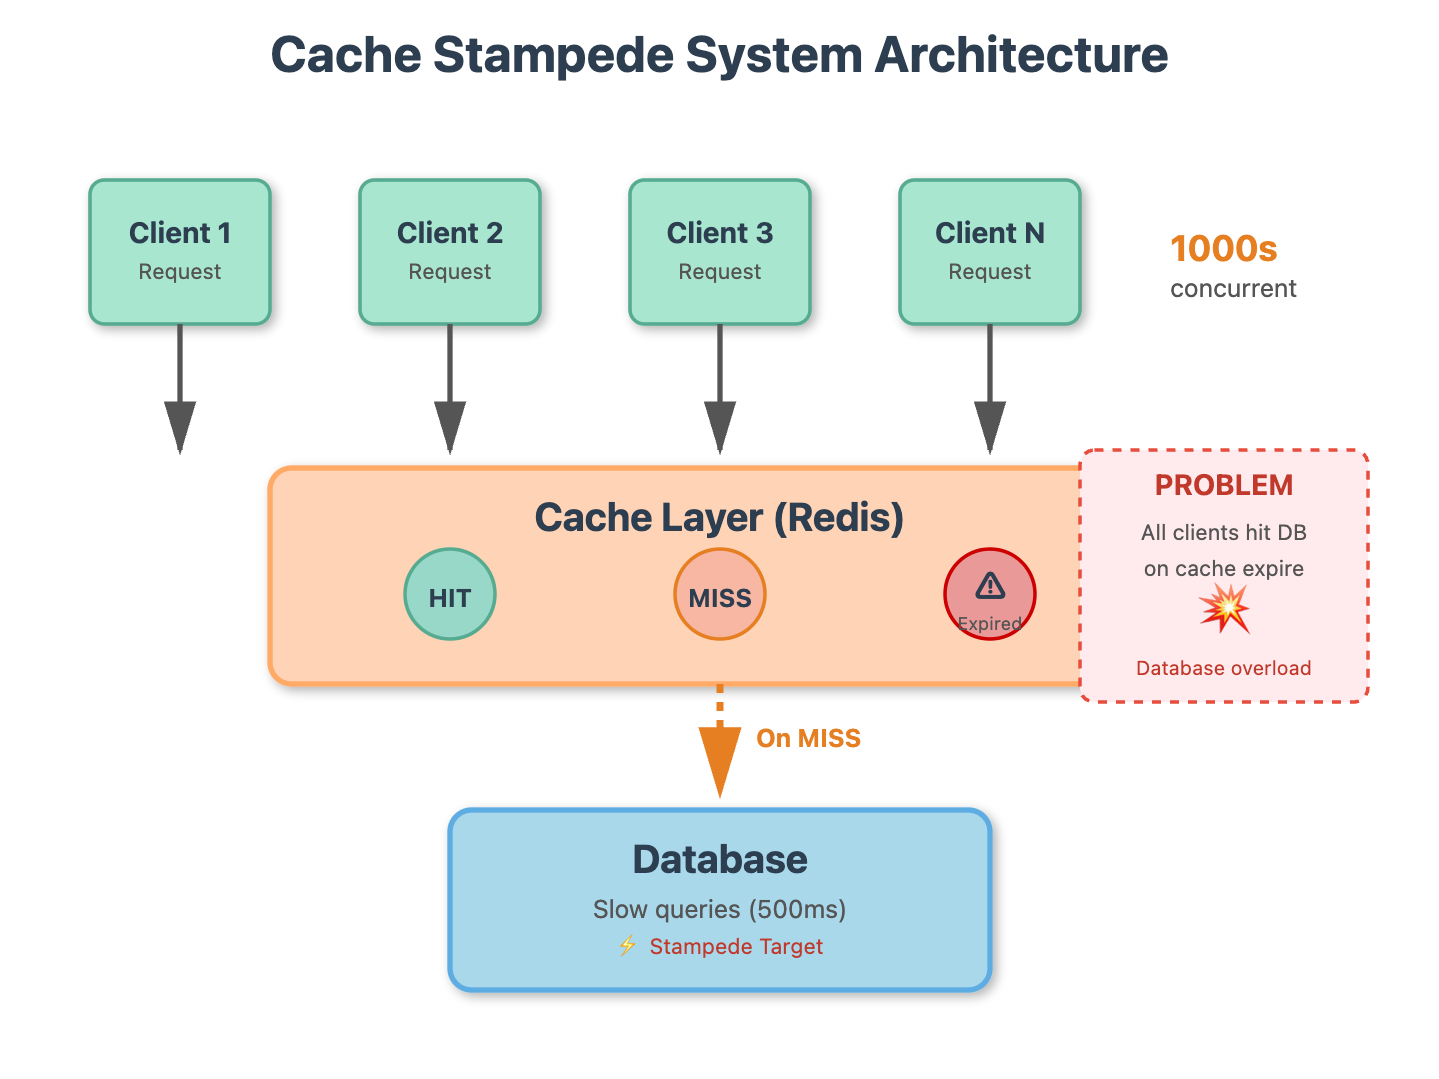
A popular cached item expires, and thousands of concurrent requests simultaneously try to regenerate it by hitting the same backend database, overwhelming it.

The $10 Million Cache Miss
At 2:47 AM on Black Friday 2019, Shopify’s product recommendation cache expired. Within 3 seconds, 47,000 concurrent requests slammed their primary database attempting to regenerate the same cached data. Database CPU spiked to 98%, response times ballooned from 20ms to 4,500ms, and checkout pages started timing out. The 8-minute outage cost an estimated $10M in lost sales.
This is cache stampede—also called the thundering herd problem. It’s the digital equivalent of everyone in a stadium rushing through a single exit door simultaneously.
Anatomy of the Stampede
Cache stampede occurs in a deceptively simple sequence. A popular item in your cache expires. The next request finds the cache empty and queries the database to regenerate it. But here’s the catch: before that slow database query completes, hundreds or thousands of other requests arrive, also find the cache empty, and each fires off their own database query. Your database drowns under the weight of identical, redundant requests.
Twitter, Reddit, and Instagram have all publicly documented stampede incidents. The pattern is universal: high traffic + cache expiration + slow data source = catastrophic cascade failure.
The Three-Layer Defense
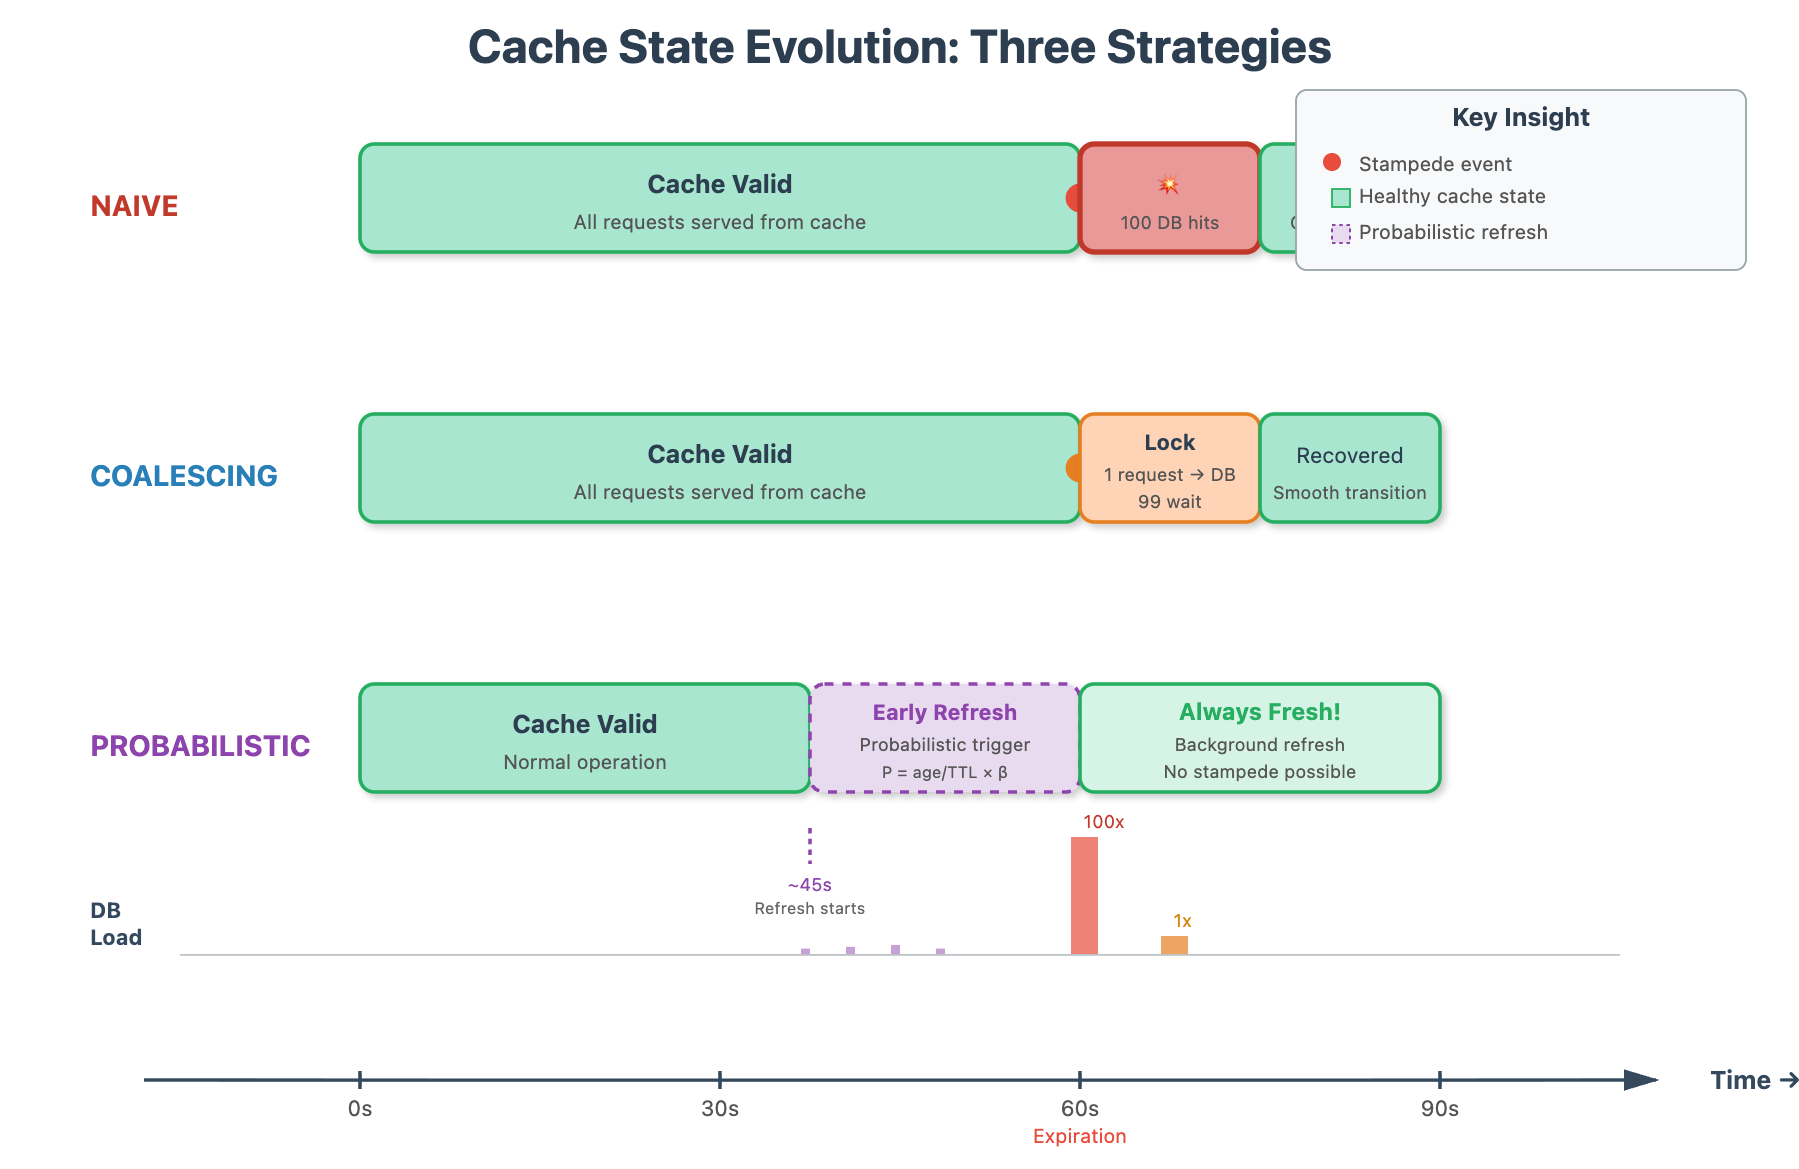
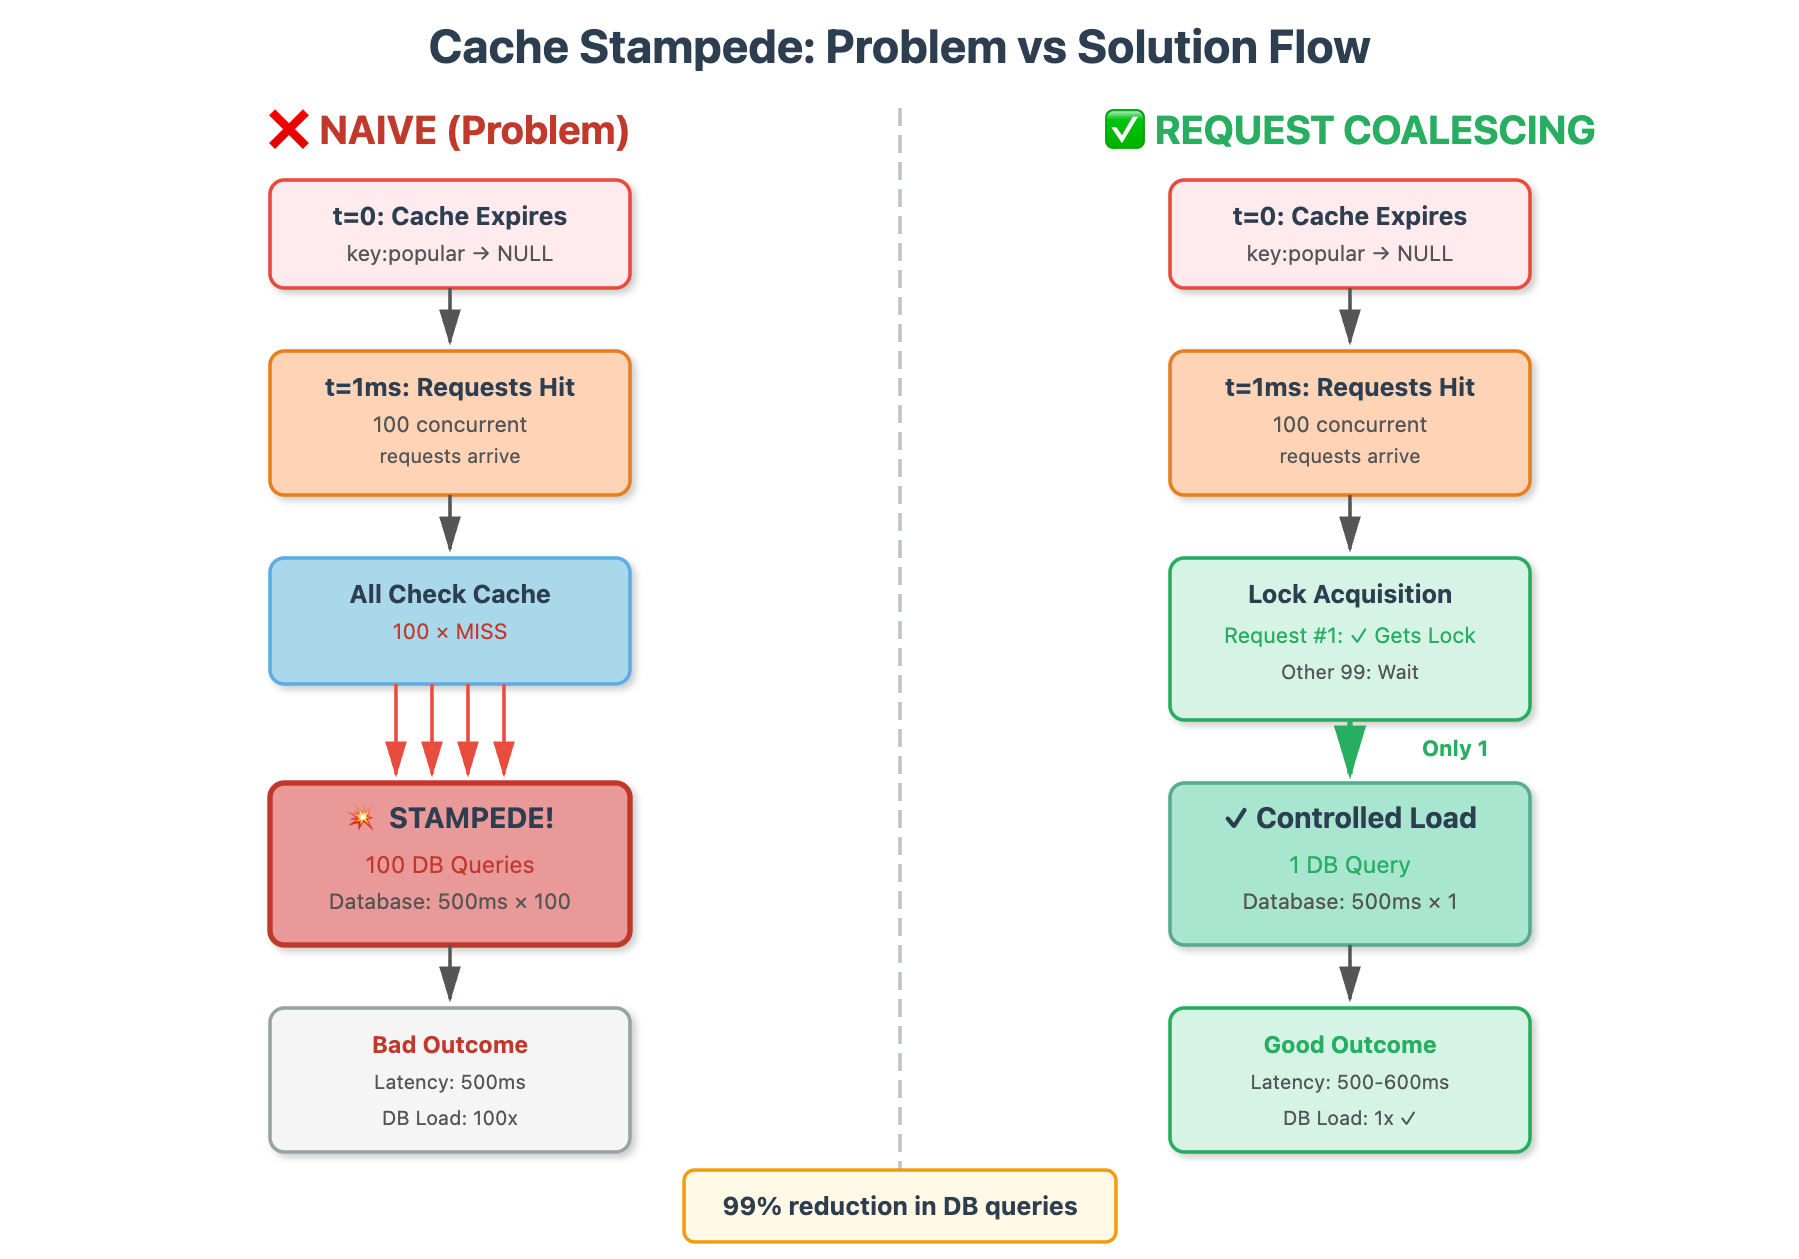
Solution 1: Request Coalescing – Only allow one request to regenerate expired data. When the first request detects a cache miss, it acquires an exclusive lock. Subsequent requests wait for the first to complete, then read the freshly populated cache. Think of it as designating one person to open the door while others wait patiently.
Solution 2: Probabilistic Early Expiration – Don’t wait for cache expiration. Randomly refresh items before they expire, with probability increasing as expiration approaches. If an item expires in 60 seconds and you have 10,000 requests per second, statistically one request will trigger early refresh around the 50-second mark. The cache never truly goes empty.
Solution 3: Background Refresh – Decouple cache reads from cache writes entirely. A dedicated background process monitors expiration times and proactively refreshes data before it expires. Your application only ever reads from cache, never regenerates.
Implementation Wisdom
The lock-based approach (request coalescing) is simplest and works for 80% of cases. Use Redis SET NX with a short TTL as your distributed lock. The lock timeout is critical—set it slightly longer than your worst-case database query time.
Probabilistic expiration shines when you can’t predict traffic patterns. It naturally load-balances cache regeneration across time. The math is elegant: should_refresh = (time_until_expiry / original_ttl) < random(0,1) * beta, where beta is your tuning factor (typically 1.0-2.0).
Background refresh is overkill for most applications but essential for ultra-critical paths. You’re trading memory (maintaining a refresh queue) and complexity for guaranteed cache hits. Companies like Netflix use this for their homepage recommendations.
The Real-World Test
Your cache strategy should answer three questions: (1) Can my database handle the load if cache completely fails? If no, you need request coalescing. (2) Can I tolerate occasional slow requests? If no, you need probabilistic or background refresh. (3) Do I have traffic patterns with predictable spikes? If yes, pre-warm your cache before the spike hits.
The ultimate lesson: cache stampede is a coordination problem, not a caching problem. You’re not trying to cache better—you’re trying to ensure only one request does the expensive work while everyone else waits or reads stale data. Master this pattern, and you’ve mastered one of the core challenges in building systems that serve millions.
Cache Stampede - Implementation Playbook
Github Repository
https://github.com/sysdr/howtech.gitQuick Start Checklist (5 Minutes)
For experienced developers who want to get up and running immediately:
Prerequisites: Node.js 14+, Docker, npm installed
Run:
bash setup.sh(fully automated)Observe: Test results comparing three strategies
Explore: Modify
server.jsendpoints and re-testClean up:
docker stop redis-stampede
Step-by-Step Walkthrough
Phase 1: Understanding the Problem (10 minutes)
Objective: Simulate a cache stampede scenario and observe the devastating impact.
Step 1.1 - Environment Setup
First, ensure you have the required tools. The setup script handles this automatically, but manually you would:
bash
# Check prerequisites
node --version  # Should be 14+
docker --version
npm --version

# Start Redis
docker run -d -p 6379:6379 redis:alpine
Step 1.2 - The Naive Implementation
This is what most developers write initially—clean, simple, and catastrophically broken under load:
javascript
// ❌ PROBLEM: Every cache miss triggers a database query
app.get(’/api/naive/:key’, async (req, res) => {
  const cached = await redis.get(key);

  if (cached) {
    return res.json({ source: ‘cache’, data: cached });
  }

  // 100 concurrent requests = 100 database queries!
  const data = await slowDatabaseQuery(key);
  await redis.setex(key, 60, data);
  res.json({ source: ‘database’, data });
});
Verification: Run the naive endpoint under load:
bash
# Install load testing tool
npm install autocannon

# Simulate 100 concurrent users
npx autocannon -c 100 -d 3 http://localhost:3000/api/naive/popular
You’ll see hundreds of database queries for a single cache key. This is the stampede.
Phase 2: Solution 1 - Request Coalescing (20 minutes)
Objective: Ensure only ONE request regenerates the cache while others wait.
Step 2.1 - Distributed Lock Pattern
The key insight: use Redis SET NX (set if not exists) as a distributed lock:
javascript
// ✅ SOLUTION: Only the lock holder queries the database
app.get(’/api/coalescing/:key’, async (req, res) => {
  const cacheKey = `cache:${key}`;
  const lockKey = `lock:${key}`;

  // Fast path: cache hit
  const cached = await redis.get(cacheKey);
  if (cached) return res.json({ source: ‘cache’, data: cached });

  // Attempt to acquire exclusive lock
  const lockAcquired = await redis.set(
    lockKey,
    ‘1’,
    ‘EX’, 10,  // 10-second timeout (safety valve)
    ‘NX’       // Only set if doesn’t exist
  );

  if (lockAcquired) {
    // Winner: regenerate the cache
    const data = await slowDatabaseQuery(key);
    await redis.setex(cacheKey, 60, data);
    await redis.del(lockKey);  // Release lock
    return res.json({ source: ‘db’, role: ‘generator’, data });
  } else {
    // Loser: wait for winner to finish
    for (let i = 0; i < 20; i++) {
      await sleep(100);  // Poll every 100ms
      const cached = await redis.get(cacheKey);
      if (cached) {
        return res.json({ source: ‘cache’, role: ‘waiter’, data: cached });
      }
    }
    // Fallback: lock holder crashed
    const data = await slowDatabaseQuery(key);
    return res.json({ source: ‘db’, role: ‘fallback’, data });
  }
});
Critical Details:
Lock Timeout: Set to 2x your max database query time. Too short = multiple requests regenerate. Too long = requests timeout if lock holder crashes.
Polling vs Pub/Sub: Polling (shown above) is simple. For production, use Redis Pub/Sub to notify waiters when cache is ready.
Idempotency: The lock prevents redundant work, but if the lock holder crashes, the next request tries again safely.
Verification:
bash
npx autocannon -c 100 -d 3 http://localhost:3000/api/coalescing/popularYou should see ~1 database query per cache expiration, regardless of concurrency.
Phase 3: Solution 2 - Probabilistic Early Expiration (25 minutes)
Objective: Prevent stampedes by refreshing cache before it expires.
Step 3.1 - XFetch Algorithm
The XFetch algorithm (used by Varnish Cache) uses probability to smooth cache regeneration:
javascript
// ✅ SOLUTION: Probabilistically refresh before expiration
app.get(’/api/probabilistic/:key’, async (req, res) => {
  const cached = await redis.get(cacheKey);
  const metadata = await redis.get(`${cacheKey}:meta`);

  if (cached && metadata) {
    const { created, ttl } = JSON.parse(metadata);
    const age = (Date.now() - created) / 1000;

    // Calculate refresh probability
    // As age → ttl, probability → 1
    const beta = 1.5;  // Tuning parameter
    const delta = age / ttl;
    const refreshProbability = delta * beta * Math.random();

    if (refreshProbability > 1) {
      // Refresh in background, return stale data
      queryDatabase(key).then(data => {
        const meta = { created: Date.now(), ttl: 60 };
        redis.setex(cacheKey, 60, data);
        redis.setex(`${cacheKey}:meta`, 60, JSON.stringify(meta));
      });
    }

    return res.json({ source: ‘cache’, data: cached });
  }

  // True cache miss
  const data = await queryDatabase(key);
  const meta = { created: Date.now(), ttl: 60 };
  await redis.setex(cacheKey, 60, data);
  await redis.setex(`${cacheKey}:meta`, 60, JSON.stringify(meta));
  res.json({ source: ‘database’, data });
});
The Math Behind It:
When
age = 0(fresh cache): probability ≈ 0%When
age = 0.5 * ttl(halfway): probability ≈ 37% (with beta=1.5)When
age = 0.9 * ttl(near expiration): probability ≈ 80%
This spreads regeneration over time instead of everyone waiting for expiration.
Tuning Beta:
beta = 1.0: Conservative, refresh very close to expirationbeta = 2.0: Aggressive, refresh much earlierProduction sweet spot: 1.5
Verification:
bash
# Should see smooth database query distribution
npx autocannon -c 100 -d 10 http://localhost:3000/api/probabilistic/popular
Phase 4: Testing & Comparison (15 minutes)
Step 4.1 - Automated Comparison
The provided test script runs all three strategies and compares them:
bash
npm testExpected Results:
NAIVE Implementation:         300+ DB queries
Request Coalescing:          3-5 DB queries (98% reduction)
Probabilistic Expiration:    8-12 DB queries (96% reduction)
Step 4.2 - Real-World Tuning
Adjust parameters based on your system:
javascript
// For write-heavy workloads
const CACHE_TTL = 30;  // Shorter TTL = more frequent updates

// For read-heavy workloads
const CACHE_TTL = 300;  // Longer TTL = fewer DB hits

// For critical paths
const LOCK_TIMEOUT = 20;  // Generous timeout
const POLL_INTERVAL = 50;  // Fast polling

// For non-critical paths
const LOCK_TIMEOUT = 5;   // Fail fast
const POLL_INTERVAL = 200; // Relaxed polling
Phase 5: Production Deployment (20 minutes)
Step 5.1 - Monitoring
Add instrumentation to track stampede metrics:
javascript
const metrics = {
  cacheHits: 0,
  cacheMisses: 0,
  lockWaits: 0,
  dbQueries: 0
};

// Expose metrics endpoint
app.get(’/metrics’, (req, res) => {
  const hitRate = metrics.cacheHits / (metrics.cacheHits + metrics.cacheMisses);
  res.json({
    ...metrics,
    cacheHitRate: hitRate,
    efficiency: 1 - (metrics.dbQueries / (metrics.cacheHits + metrics.cacheMisses))
  });
});
Step 5.2 - Alerts
Set up alerts for stampede indicators:
Database query rate spike (>10x normal)
Cache hit rate drop (<90%)
Lock wait time increase (>500ms p95)
Step 5.3 - Circuit Breaker
Add a safety mechanism for total cache failure:
javascript
let circuitBreakerOpen = false;

// If DB query rate exceeds threshold, serve stale data
if (dbQueryRate > THRESHOLD) {
  circuitBreakerOpen = true;
  // Serve stale data from cache, even if expired
  const stale = await redis.get(`stale:${key}`);
  if (stale) return res.json({ source: ‘stale’, data: stale });
}
Troubleshooting Guide
Problem: Requests timeout waiting for lock Solution: Decrease lock timeout or increase database query performance
Problem: Still seeing stampedes with coalescing Solution: Verify Redis SET NX is working (check Redis version 2.6.12+)
Problem: Probabilistic refresh too frequent Solution: Decrease beta parameter (try 1.0)
Problem: Probabilistic refresh too infrequent
Solution: Increase beta parameter (try 2.0)
Next Steps
Implement request coalescing in your production service
Add comprehensive metrics and alerting
Load test with realistic traffic patterns
Consider combining solutions (coalescing + probabilistic)
Explore advanced patterns: cache warming, multi-tier caching
Remember: The best defense against cache stampede is never having a cold cache. Pre-warm before traffic spikes!